
Ugly colors, old floral patterns, animal prints, chips and cracks...all these things can ruin a good vase.
Don't donate those ugly old pots...or maybe you should! Then I can scoop them up and give them a new look and new life!
You wanna try too?!??!
First things first...let's talk spray paint.
My favorite is Krylon Fusion MATTE finish. Why? It doesn't drip or crackle like others and it covers well and dries quickly.
I also tried a couple spray paint options that I have never used before. The "wet dirt treatment" that I will describe later works best with a textured vase. However, they are hard to find. So, I decided to try making my own texture using textured spray paint. Here are the deets...let's just say there weren't any squeals of joy.
I used Rustoleum Textured Spray Paint on this vase. It sprays like a fire hose! I tried holding the can a little further away to see if that helped but no luck. This is a problem because you don't get a nice even spray and it collects in one area. It also comes out foamy so it is hard to see the coverage you are getting. This is three coats and 24 hours of waiting for it dry.

I also tried using Rustoleum Stone and this was not as expected. The coverage was terrible. If you wanted to obtain the look on the cap...it would take 100 coats. Because nobody has time for that noise...I went over it with a regular spray paint after one coat. It also takes a LONG time to dry...like at least 24 hours long.

Now that you have the skinny on what type of spray paint...let's prep your thrift finds.
Wipe down your vase and remove any stickers and sticky residue. This will save you a TON of heartache. If you spray paint over dirt or grime, you might as well give up because the paint will crack worse than my crows feet...and that is saying a lot.
Let's get started, the possibilities are endless. Let's put some lipstick on these pigs!

I went with all neutrals...because that is just my style. Call me a plain Jane and boring all you want.

I wanted to keep some smooth and solid and others distressed. The newest rage is the "Wet Dirt Treatment" I did a few of these before and learned some tricks along the way which I will share with you.
1. Make sure you let your spray paint dry completely. If you don't, you may rub it off and show some of the hideous colors you just covered up.
2. Porous or textured vases work the best. This allows the dirt to stick in crevasses and give a good distressed look. I did find that the vase that I used the texture paint (as negatively referenced above) worked really well with this method. Using that textured spray paint and then spraying over it with a regular spray is my recommendation. Unfortunately, it still doesn't help the dry time.
3. Wetter is better. Ew. It sounds gross and feels even grosser (word?). Here is the consistency that I used. Mother nature helped me out with our recent snow fall.

4. Let the dirt dry completely before cleaning.


5. Tame the elbow grease. The harder you push when wiping off, the less distressed you get. Start rubbing them with a dry rag, and slowly wipe more to get your desired look.
Drum roll please.....


If you don't want to attempt this process yourself but want this look...shop our curated shelf decor sets. We style, you buy and replicate in your home.
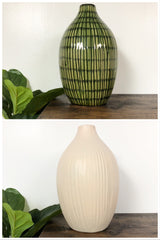
Just in case you forgot what they looked like before...here are some side by sides for your viewing pleasure.